Registration services will be closed on Monday, Dec 15th at 11:59 PM and will reopen on Wednesday, Dec 17th, at 12:01 AM. This pause is necessary to ensure data integrity during Canvas roster maintenance.
Resources for Students
How To Optimize PDF Files Using Acrobat Pro
Need to print a large PDF file? Optimize it to shrink the file size, which will get your print through the queue faster and with fewer problems. If you want to print from Photoshop, Illustrator, or InDesign, DON'T DO IT! Instead, save the file as a PDF, open it in Acrobat Pro, optimize it, and print from Acrobat Pro. This controls the file size and provides a way to reduce printing errors such as rotated and cut-off prints.
- Step 1. Open your PDF in Acrobat Pro. Click Advanced, PDF Optimizer.
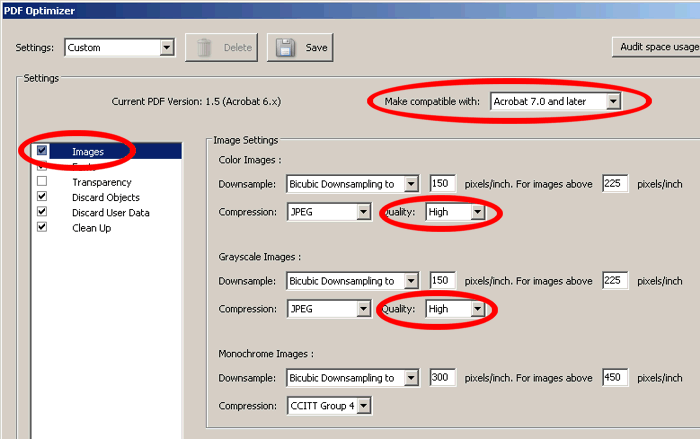
- Step 2. Change "Make compatible with" to "Acrobat 7.0 and later" (see Figure 1 below ) [Note: people with Acrobat 6.0 and earlier won't be able to open your file if you send it to them.]
- Step 3. Click Images on the left. Change the two Quality settings to "High". (see Figure 1 below) [Note: in some cases you may need to choose Maximum quality to better preserve image quality; however, the trade off is usually a much larger file size and a longer print time.]
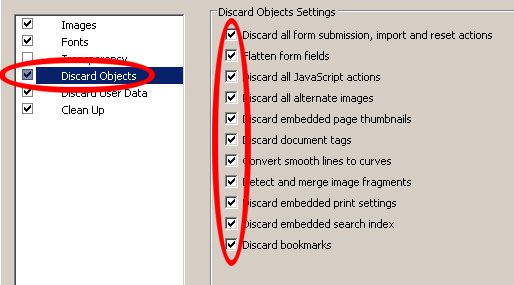
- Step 4. Click Discard Objects on the left. Make sure everything is checked (see Figure 2 below)
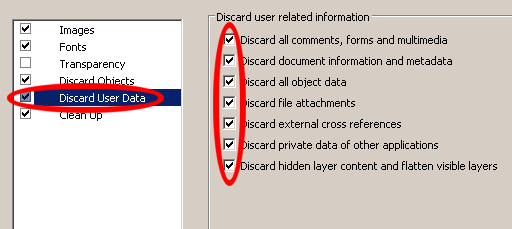
- Step 4. Click Discard User Data on the left. Make sure everything is checked (see Figure 3 below)
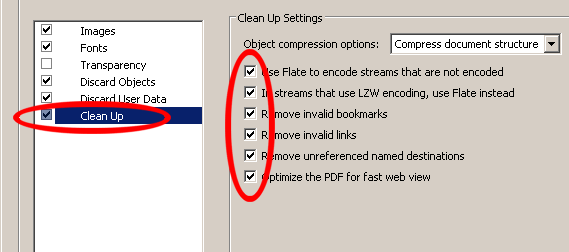
- Step 5. Click Clean Up on the left. Make sure everything is checked (see Figure 4 below)
- Step 6. Click OK. Choose a location to save your optimized file. Don't save over your original filename, in case you need to go back and adjust settings. Add the word "opt" to your file name so you know it's been optimized (example: elevation-opt.pdf). Now print the new PDF.
Other Tips:
- Tip 1. Flatten layers in Photoshop, Illustrator or InDesign before saving as a PDF.
- Tip 2. Using too many high resolution photos in Photoshop or Illustrator can cause problems when you save as a PDF and try to optimize. Plus it can cause your file to take a very long time to process inside the plotter, and possibly fail to print. Reduce the resolution of the photos to 150 or 200 dpi before creating your PDF.
- Tip 3. File sizes above 150 mb will not print.
- Tip 4. Always use the Postscript version of the printer when sending files from Acrobat, Photoshop, Illustrator or InDesign.
- Tip 5. There are rare occasions when optimized PDFs don’t print correctly. In that case, you may need to print a non-optimized PDF, or print to the non-postscript driver, or print directly from the program that you used to originally create the file. Please don’t do this unless necessary!
- Tip 6. If you get a color change after creating an optimized PDF, go back into the PDF Optimizer under Images and make sure Color Image Downsampling is set to Bicubic, at 150 pixels/inch for images above 225 pixels/inch.
- Tip 7. Seek help from an Information Technology Team when needed.

Figure 1 (From the University of Syracuse School of Architecture)

Figure 2 (From the University of Syracuse School of Architecture)

Figure 3 (From the University of Syracuse School of Architecture)

Figure 4 (From the University of Syracuse School of Architecture)

